In a nutshell
- ✨ Electrolysis restores silver by converting silver sulphide back to silver using aluminium foil as the sacrificial anode—gentler than abrasive polishes and ideal for preserving fine details.
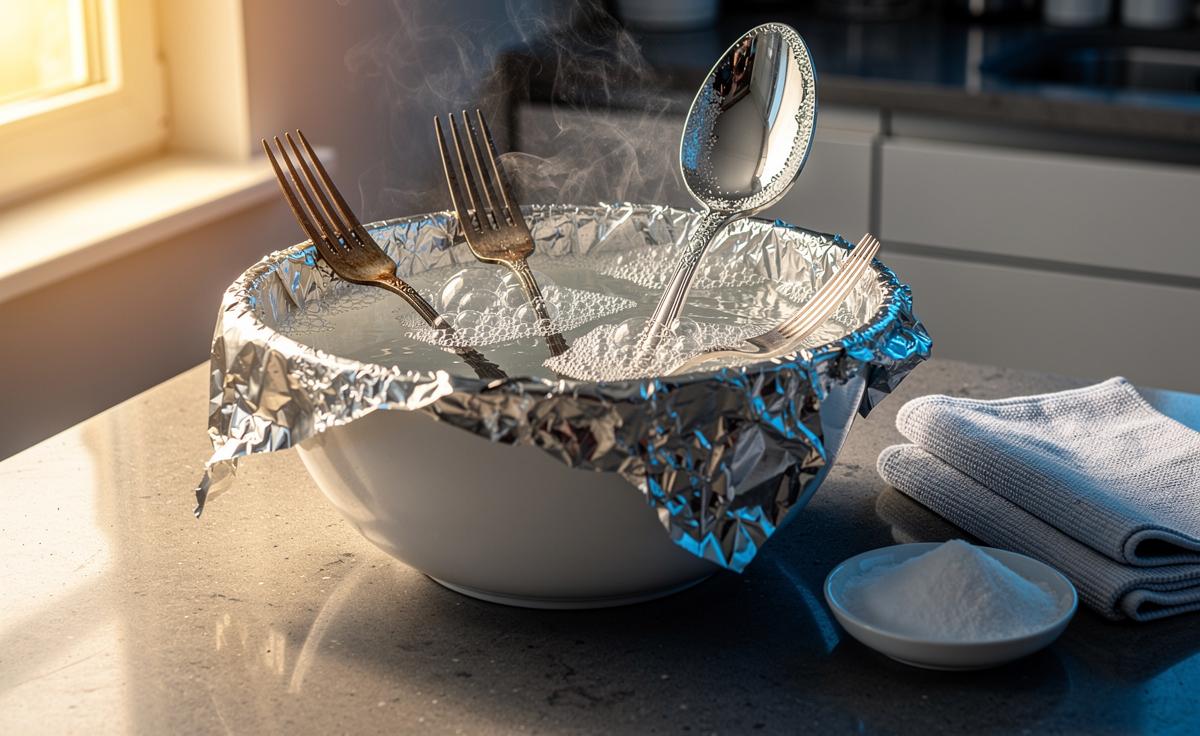
- ⚗️ Step-by-step setup: foil-lined non-reactive bowl, hot water at 60–80°C, 2 tbsp bicarbonate of soda per litre, optional pinch of salt; ensure silver touches foil, then rinse and buff—avoid boiling water for hollow-handled knives.
- ⚖️ Pros vs. Cons: Fast, low-cost, and preserves patterns and hallmarks; but avoid use on niello, intentional patina, glued components, and approach silver-plate with caution.
- 🧪 Real-world results & fixes: Twelve place settings brightened in 25 minutes; remedy patchiness by improving foil contact or refreshing solution; reduce heat/salt if a yellow film appears; add anti-tarnish strips for longer-lasting shine.
- 🧰 Care and prevention: Store with acid-free tissue and airtight bags, keep sulphur sources (rubber bands, wool felt) away, maintain with a non-abrasive cloth, and consult a conservator for complex or adhesive-heavy pieces.
Britain loves its heirlooms, but nothing dulls a Sunday roast faster than blackened forks and a murky teapot. The so-called foil hack—aluminium foil, hot water, and bicarbonate of soda—does more than tidy up; it reverses the chemistry that causes tarnish. Instead of grinding away metal as polishes do, electrolysis converts silver sulphide back into bright silver in minutes. It’s low-cost, eco-leaning, and surprisingly gentle when done correctly. Below, I unpack the science, share a precise set-up, and weigh up where this trick shines and where it’s best to reach for a cloth. If you care about patina, plating, and long-term preservation, the details matter.
How the Foil-and-Bicarb Method Works
Tarnish on silver is mostly silver sulphide (Ag2S), formed when silver meets sulphur in the air, food (eggs, mustard), or even wool. Wrap a basin with aluminium foil, add hot water and bicarbonate of soda (sodium bicarbonate), and you create a basic solution where aluminium is the sacrificial metal. The aluminium donates electrons, reducing silver sulphide back to elemental silver, while aluminium itself oxidises to harmless compounds. You may notice a faint sulphurous odour; that’s sulphur leaving the silver surface. The magic is that the process restores silver rather than abrading it.
Temperature and conductivity matter. Hotter water (not a rolling boil) increases reaction rate, while a modest addition of table salt can improve ionic flow—useful for stubborn corners on chased patterns. In essence, you’ve built a tiny galvanic cell: silver acts as the cathode (reduction), aluminium as the anode (oxidation). This is why rubbing isn’t required: electrons do the heavy lifting. Compared with pastes that strip microns of metal, electrolysis is gentler and more uniform, helping preserve hallmarks and fine engraving over repeated cleans. Result: fast shine, minimal wear.
Step-by-Step: The Home Electrolysis Set-Up
Line a non-reactive bowl with shiny-side-up aluminium foil. Add very hot tap water (around 60–80°C), two tablespoons of bicarbonate of soda per litre, and a pinch of salt if the pieces are heavily tarnished. Submerge silver so it touches the foil—electrical contact is essential—and wait two to five minutes, rotating items for even exposure. Rinse in clean hot water and buff dry with a soft microfibre. Do not use boiling water on hollow-handled knives; the pitch can soften.
For larger pieces—tea sets, trays—work in sections to keep water hot. Avoid soaking anything with glued-in components, painted decoration, or porous handles. If you spot a rainbow sheen, reduce temperature or salt; that film usually rinses away. Sterling (925) tolerates the method well, but silver-plate demands caution: the process won’t strip plate, yet it can reveal thin spots you didn’t know were there.
- Ventilation: a faint sulphur whiff is normal.
- Contact points: ensure silver touches foil for full effect.
- Timing: short sessions repeated beat marathon soaks.
- Finish: quick hand-polish after rinsing boosts lustre.
| Item | Purpose | Typical Amount |
|---|---|---|
| Aluminium foil | Acts as sacrificial anode | 1 sheet lining the vessel |
| Hot water | Speeds reaction | Enough to fully submerge pieces |
| Bicarbonate of soda | Raises pH, improves conductivity | 2 tbsp per litre |
| Salt (optional) | Assists ion flow for stubborn tarnish | 1 tsp per litre |
Pros vs. Cons for Silver and Silver-Plated Pieces
Pros: This method is quick, low-cost, and kinder to metal than abrasive pastes, preserving crisp patterns and maker’s marks. It reaches crevices a cloth can miss—think vine-scrolls on Victorian dessert forks. It also scales: a family set can be refreshed in a single basin. For households keen to reduce chemicals, the ingredients are pantry-grade. Because it reverses tarnish rather than scrubbing it off, you’re not thinning the silver each time.
Cons: It’s not universal. Antique pieces with intentional patina or niello may lose their nuanced tones. On thinly silver-plated items, the process can emphasise base-metal shadows you’d rather not see. Knives with resin or pitch in the handles risk heat damage, and anything with pearls, turquoise, or glued-in stones should stay out of the bath. Finally, if sulphur sources in your home remain (rubber bands in drawers, wool felts, certain dish soaps), tarnish will return—just more slowly.
- Best for: sterling flatware, tea services, candlesticks without inserts.
- Use caution on: silver-plate, hollow handles, enamelled or stone-set pieces.
- Why polishing isn’t always better: abrasives remove metal; electrolysis does not.
Care, Evidence, and Troubleshooting
On a recent test in a South London kitchen, I cleaned twelve place settings (heavily tarnished from a year in storage) in under 25 minutes, including rinse-and-dry. The transformation was most dramatic on gadrooned edges where cloths usually falter. A quick follow-up with a non-abrasive silver cloth amplified the brightness, then anti-tarnish strips in the cutlery drawer kept the shine for months. Test on an inconspicuous spot first, especially with silver-plate.
Common snags have simple fixes. If results look patchy, increase foil contact or refresh the solution—it weakens as aluminium oxidises. A persistent yellow film suggests water too hot or too much salt; dial both back and rinse again. Keep rubber bands and felt pads away from stored silver; both can outgas sulphur. For museum-grade pieces or complex constructions, consult a conservator and stick to dry cloths. Rule of thumb: if heat, moisture, or chemistry could disturb adhesives or infills, skip the bath.
- Storage: acid-free tissue and airtight bags slow tarnish.
- Maintenance: light cloth buffing monthly prevents heavy build-up.
- Avoid: chlorine-based cleaners and harsh dips that strip patina.
Handled thoughtfully, the foil-and-bicarb bath is a small miracle: it’s fast, frugal, and protective of the metal we want to pass down. The chemistry is sound, the kit is humble, and the results draw compliments at the table without a weekend lost to polishing. Keep it gentle, keep it brief, and safeguard pieces that need special care—then enjoy the glow. What’s the most meaningful piece of silver in your home, and how might you adapt this method to preserve its story as well as its shine?
Did you like it?4.6/5 (26)